At SPSCC we have a number of tools available to help with your online instruction. Open the pages below to get information about how to use these tools.
Hypothesis is a social annotation tool that can be integrated into your Canvas course. Instructors select a text (a PDF or webpage) for students to read. Students are then able to read the text and annotate it as they read, adding highlights, text, or images in a class conversation.
If you are curious about adding Hypothesis content into your course, contact the Center for Teaching and Online Learning for support, or visit the Hypothesis help pages for many useful guides to get started.
For ongoing Hypothesis training, check the CTOL calendar or go to a Hypothesis workshop!
How to Use Hypothesis in Canvas
Follow the steps below (or read these instructions from Hypothesis) to set up a Hypothesis assignment. You don't need to install anything in Canvas.
- When you are ready to assign a reading in Hypothesis, first locate your file. We recommend using a PDF (always make sure that your PDF is accessible). Here is more information on scanning documents and running OCR on existing PDFs to make sure your documents are accessible.
- Upload your file to the Canvas course where you plan to use Hypothesis.
- Then create a new assignment.
- In submission type, choose External Tool, then choose Hypothesis and select your file.
If Your Hypothesis Assignment Isn't Working
Sometimes Hypothesis assignments don't work because the file is actually in another Canvas course. This usually happens with a copied Canvas course. If students report being unable to open the Hypothesis assignment, please re-upload your file to the current Canvas course or reach out to CTOL for support. We can quickly troubleshoot what is causing the issue.
Sometimes a Hypothesis assignment has an issue if you set it up using a URL instead of a Canvas file. This happens when a URL changes. Because of this, we recommend uploading your PDF files directly into Canvas instead.
Accessibility in Hypothesis
Hypothesis should be as accessible as the documents that have been loaded in it are. That means, you must be sure that your documents are actual text that can be read by a screen reader.
- Hypothesis and Screen Readers
- Creating annotations using only your keyboard
- Adobe: Scanning documents to PDF (see bottom of page for instructions on using OCR in Adobe)
Hypothesis Support
CTOL can provide support with Hypothesis, and in our experience, Hypothesis is also really responsive to support questions. You can search the Hypothesis help center or submit a help request here.
H5P is a plugin that allows instructors to create accessible interactive content for their courses. The H5P plugin is available to all instructors within Canvas. With H5P you can create new, interactive activities or modify current assignments to make them more accessible and engaging.
There are many types of H5P activities: H5P Content Types & Examples.
H5P Activities include
- Interactive Video
- Interactive Book
- Cornell Notes
- Quizzes
- Fill in the Blanks
- Structure Strip
- Course Presentation
- and more
Creating H5P Content in Canvas
To start making H5P content, simply go to a page or assignment in Canvas, or create H5P content on the SPSCC H5P page.
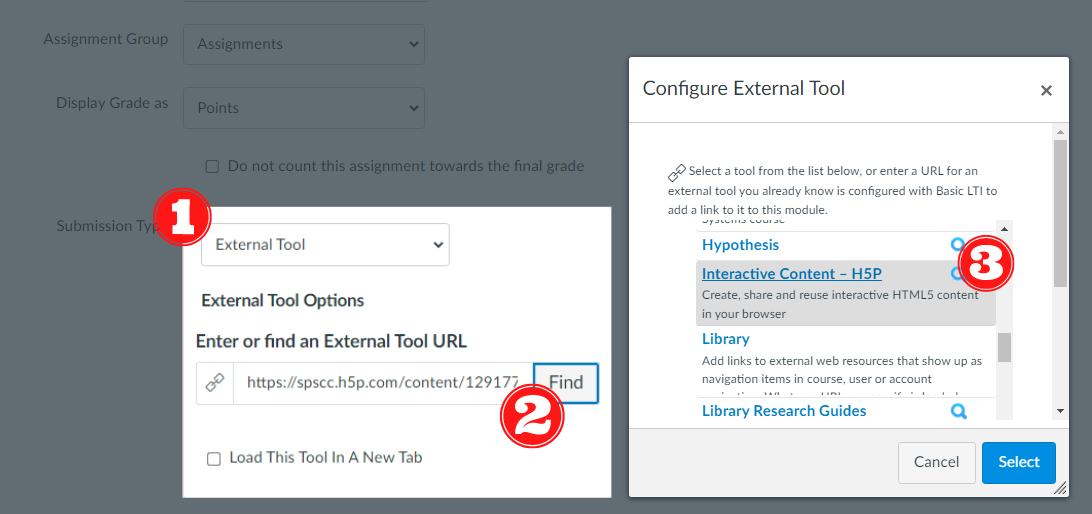
To add ungraded H5P, click the H5P button in the rich content editor. To add grade H5P activities to an assignment, go to the submission type menu and click external tool. Find and select Interactive Content – H5P.
To Add Ungraded H5P Content
Use the H5P icon in the rich content editor (the toolbar in a Canvas page or assignment).

To Add Graded H5P Content
Click Submission Type and select External Tool. Then find "Interactive Content - H5P" from the menu and click select.
As an institution that makes the Microsoft Office suite of tools readily available to our students, it is important to encourage them to make the most of these tools and all of the features they have. It is important to also remember that most of our students coming from high school are only or mostly familiar with the Google platform and may not even be aware that they have free access to Microsoft. Below are a few resources that can be useful for the instructional environment.
Microsoft Office Resources
Switch to Microsoft 365 from Google Workspace - Microsoft Support
Microsoft 365 Quick Starts - Microsoft Support
Outlook training - Microsoft Support
PowerPoint for Windows training - Microsoft Support
The Microsoft OneDrive Learning Tools Interoperability (LTI) App integrates with your LMS to bring Microsoft OneDrive and Microsoft Office 365 directly into your most important workflows.
Microsoft OneDrive LTI App allows you to:
- Attach Office 365 files including Word documents, PowerPoint presentations, and Excel from the Rich Content Editor
- Distribute Office 365 cloud assignments.
- View and organize your personal and course Microsoft Office files.
- Create collaborations where course members can work together on shared documents in real time.
- Access multiple Microsoft OneDrive accounts, including personal and school accounts.
- Integrate Office 365 files with your course modules.
- Use your Microsoft account for single sign-on with your LMS.
IMPORTANT: If you have never used OneDrive and are accessing it within your LMS for the first time, OneDrive Picker will not appear nor display an error. To resolve this, visit https://onedrive.com/ and sign into your school account. After signing, you should be able to access the OneDrive Picker within your LMS.
How do I use Microsoft OneDrive for assignments in Canvas?
For detailed information, please visit Use Microsoft OneDrive with your LMS - Microsoft Support.
This site provides detailed information on how to create and how students can use a cloud assignment, a template-less assignment, collaborate, and add Microsoft Files to your course modules.
You can set up a Microsoft Team within your Canvas course. This is a useful tool to facilitate student conversation.
Important: students will only appear in your team if they are using their SPSCC email as their default email (in ctcLink). Students can update their emails in ctcLink.
Setup
In your course menu go to Settings, and click on the blue Integrations tab in the top row. You'll see the slider button, and the > Microsoft Sync title.
- Click on the slider to enable the integration State
- Click on the > icon to reveal the Sync Now button
- Click on the Sync Now button
Once the integration is enabled, a sync to Microsoft Teams will be triggered automatically by any changes to course enrollments.
Note: When enrollments changes are made in a course that has enabled Microsoft Sync, it may take up to 10 minutes for those changes to sync to Microsoft Teams.
When you've completed the sync process your Microsoft Teams Menu item will change to Microsoft Teams classes. In your course's main left navigation menu, click "Microsoft Teams classes." This will populate your Canvas class into a Team; when the page refreshes, you will see an icon with your class name on the page.
Click in the icon area to be taken to your Teams app or web client; this will transition you to a web window that offers you and your students the option to download an app or work on the web version of Teams.
Once you've chosen an option, you will be offered options to set up your team.
Once you activate the team, you may continue to create and add to it; students can see content you add and receive posts in the team channel
- Upload files, if desired
- Create a OneNote class notebook, if desired
- Activate the team to make it visible to students
Panopto is the tool that SPSCC uses to host videos in Canvas. You can record, upload, and edit videos. Your Panopto login information is your Clipper ID and password.
For Panopto support, contact ctol@spscc.edu
Accessing Panopto in Canvas
You can access Panopto by clicking on the "Panopto Recordings" link in your Canvas Navigation menu. To create a video, click the + Create button.
From Canvas, you can also go into the full Panopto site to edit and organize videos. Click the Open in Panopto icon ![]() on the right of the screen to get into your Panopto account.
on the right of the screen to get into your Panopto account.
Embedding Panopto Videos
You can use the Panopto Recording button in the Canvas Rich Content Editor to embed videos in any editable Canvas item.
It's simple and quick, and transfers viewing permissions for the video embedded in the page to any viewer of the page, no matter the course location.
This means you can easily import embedded videos into a new course section, as you would other Canvas content. Embedded content remains viewable to the new section without any additional management on your part.
Installing the Panopto Application
On an SPSCC device: You will need support from the SPSCC Helpdesk (596-5544) to install Panopto on your college machine. Help technicians can remotely install your Panopto recorder while you're on the phone with them!
On your personal device: You will need to download and install the latest version of Panopto Recorder
Check your Panopto Application Version
In order for Panopto to function correctly, you will need to update or install the latest version (9.02 or higher) on your device. In the Panopto app, can check your version by clicking on Settings (the gear icon). The version number will display in the bottom right of the window.
Additional Panopto Resources
- Webinar Recording – a one hour recording of the Panopto Creator Training for SBCTC
- SBCTC Panopto FAQ – document contains answers to frequently asked questions during the webinar
- SBCTC Additional Questions – document contains answers to additional questions asked during the training webinar
Panopto Support
- Panopto Support Center – page contains links to Panopto support documentation, video tutorials, and forums
- Getting Started Guide – page contains a collection of resources for getting started with Panopto
- Forum Tips and Tricks – page contains questions and Answers from Panopto’s Tips & Tricks forum
- Video Tutorials – page contains links to a variety of “how-to” Panopto video tutorials
- Panopto Community – search the Panopto Community for answers to questions you may have
Pressbooks is simple book production and content management system software based on WordPress technology. You can find and publish OER (Open Educational Resources) textbooks, online media collections, scholarly articles, syllabi, fiction and non-fiction books, white papers, and more in multiple formats including:
- Thin Cartridge for Canvas
- MOBI (for Kindle ebooks)
- EPUB (for all other ebookstores)
- designed PDF (for print-on-demand and digital distribution)
- You can even deep link your Pressbooks into your Canvas modules, so students can access chapters easily within their courses: Use Deep Linking to Bring Pressbooks Content into a Course.
Books designed in Pressbooks also have integration with H5P activities, can be imported into Canvas, and can be customized to serve your own courses. As such, they can be a robust alternative to expensive textbooks.
For support finding OER for your courses, please contact SPSCC's OER librarian, Ryer Banta, or check out the library's Faculty and Staff Guide on Open Education.
In addition, SPSCC's Alaka Pradhan has created this online introduction to Pressbooks.
How to Access Pressbooks
To Sign in to Pressbooks for the first time, go to SPSCC's Pressbooks site and click on the Sign in link in the upper right-hand corner ( please do not use the sign up link, or your authentication will not work).
You will be redirected to the SPSCC Authentication page, where you will enter your college email and email password. When authentication is complete you will return to the SPSCC Pressbooks page.
Create a New Book
- To start a new book, click on Create a New Book in the top right corner.
- Then fill out the form to create the book's URL within SPSCC's Pressbooks library.
- When Pressbooks has finished processing your request, you will be redirected to the Dashboard of your new book.
Clone a Book
- Cloning a book means that you are copying an already existing book and adding it to your SPSCC account. You can then edit and adapt the book, or import it into your Canvas course.
- To clone a book, or create a new book click on the My Books item on the upper left of the red Pressbooks menu bar and select Clone a Book from the dropdown.
- Find the url of the book you wish to clone via the directory, and open it or right click the title to copy the url to your clipboard. In your dashboard, click on Clone a Book.
- In the form that follows, enter the URL you copied, the new url for your clone, and your desired title. Your clone process may take a few minutes, depending on the size and number of items in the original.
Pressbooks Support
If you'd like a hand getting started with Pressbooks creation, please contact Ryer Banta or visit the Pressbooks user guide.
Pressbooks allows each institution three "Network Managers" who may act as support contacts if you need help from Pressbooks technical support. If you need network-level support or need to get in touch with Pressbooks' own support team, contact Ryer Banta or ctol@spscc.edu.
What is SensusAccess?
SensusAccess is an automated document conversion service that allows you to convert your readings into alternate formats. You can also use SensusAccess to convert inaccessible or tricky documents into more accessible formats. With SensusAccess, you can convert your readings, slides and lecture notes into formats that work best for you such as:
- MP3 files
- E-books
- BeeLine Reader
- Digital Braille books
- Structured audio books in DAISY and e-books with media overlay
You can also use SensusAccess to convert scanned PDF documents, pictures of text captured with your smartphone as well as PowerPoint presentations into formats that are more useful for you or easier to work with.
Additionally, through advanced artificial intelligence and machine learning, SensusAccess can be used to translate from language-to-language with a very high degree of accuracy.
SensusAccess is a great service if you are having difficulties with printed text, if you want to experiment with different learning styles, if you need assistance when reading text in a foreign language or if you simply want to make your readings available on the go.
How do I use SensusAccess as an Instructor?
SensusAccess is available as an LTI in Canvas and as a standalone web form. The SensusAccess LTI makes document conversion of course material into audio books, Braille, digital large-print, e-books and other accessible formats available directly from within the course sections of Canvas.
This feature should be turned on by default in all course. However, if it is not, simply navigate to your course settings and enable SensusAccess from the right-hand menu of options. This will activate SensusAccess for use for your students in this course.
How can I learn more about SensusAccess?
The SensusAccess E-learning Course offers a comprehensive course on the SensusAccess service and is intended for stduents, staff, and faculty. It is divided in to nine modules. Please include any or all modules to your course resources as you deem relevant.
SensusAccess Frequently Asked Questions